
During the festive season we went shopping in Merlyn Shopping centre, and found ourselves in a bookshop. Ursula picked up a book about mosaic and showed me some designs; we were both impressed with it, but put it back…..
The next day surprised Ursula by going back and buying the book. (Easy Mosaics for your home and garden, Sarah Donnelly). Ursula is a slow reader so I decided to go to a local arts and crafts shop and buy what we needed to get started. With some help and advice from the shop assistant I walk out with a mould, tile nipper, glass cutter and an assortment of small glass tiles. We were both very exited to get started on the first stepping stone.

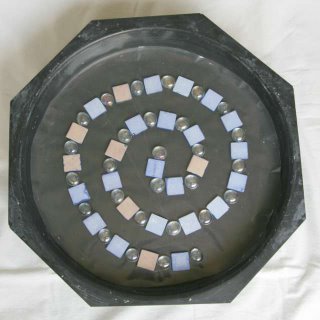
The instructions in the book was not followed completely, our version of the stepping stone is made by placing the design upside down inside the mould on top of sticky plastic film that lies on the paper design.
Cut glass and beads is placed on the design, sticking to the bottom of the mould. The paper design is removed and can be reused after the glass is packed and stuck to the plastic film.
Unfortunately it was trail and error affair with the concrete mixture. One week our dustbin was unusually heavy, with all the concrete that was thrown away. It turns out that normal concrete ready mix is not strong enough. In desperation a bag of cement was bought minutes before the hardware shop closed. The cement content in the ready-mix is doubled to get the correct hardness of the stepping stone.

Colored oxide is added to the dry cement mixture to give the stones a bit more natural color. Due to our lack of space, the cement mixture has to be mixed in a bucket in the kitchen. I found that placing a plastic bag in the bucket saves a lot of cleaning up afterwards.
The cement mixture is carefully pored inside the mould on top of the design. After 24 hours the stepping stone is ready to come out of the mould. The sticky plastic film is peeled off and the stone is brushed with a hard brush to get rid of all unwanted cement on the tiles.
Santa’s big red bag was heavy with stepping stones this year.


